If you’re looking for a sweet treat this holiday season, Peppermint Oreo Truffles are a must-try. These bite-sized delights burst with chocolate and mint flavor, making them perfect for parties or gifts. I’ll guide you step-by-step on how to create these simple yet scrumptious truffles. Let’s dive into the ingredients and techniques that will make your dessert shine this festive season!
Why I Love This Recipe
- Simple to Make: This recipe requires minimal ingredients and straightforward steps, perfect for both beginners and experienced bakers.
- Decadent Flavor: The combination of rich cream cheese and crunchy Oreo cookies creates a delightful treat that’s hard to resist.
- Festive Touch: With the addition of peppermint and white chocolate, these truffles are ideal for holiday gatherings and celebrations.
- Customizable: You can easily adjust the flavors or toppings to suit your preferences, making these truffles versatile for any occasion.
Ingredients
Essential ingredients for Peppermint Oreo Truffles
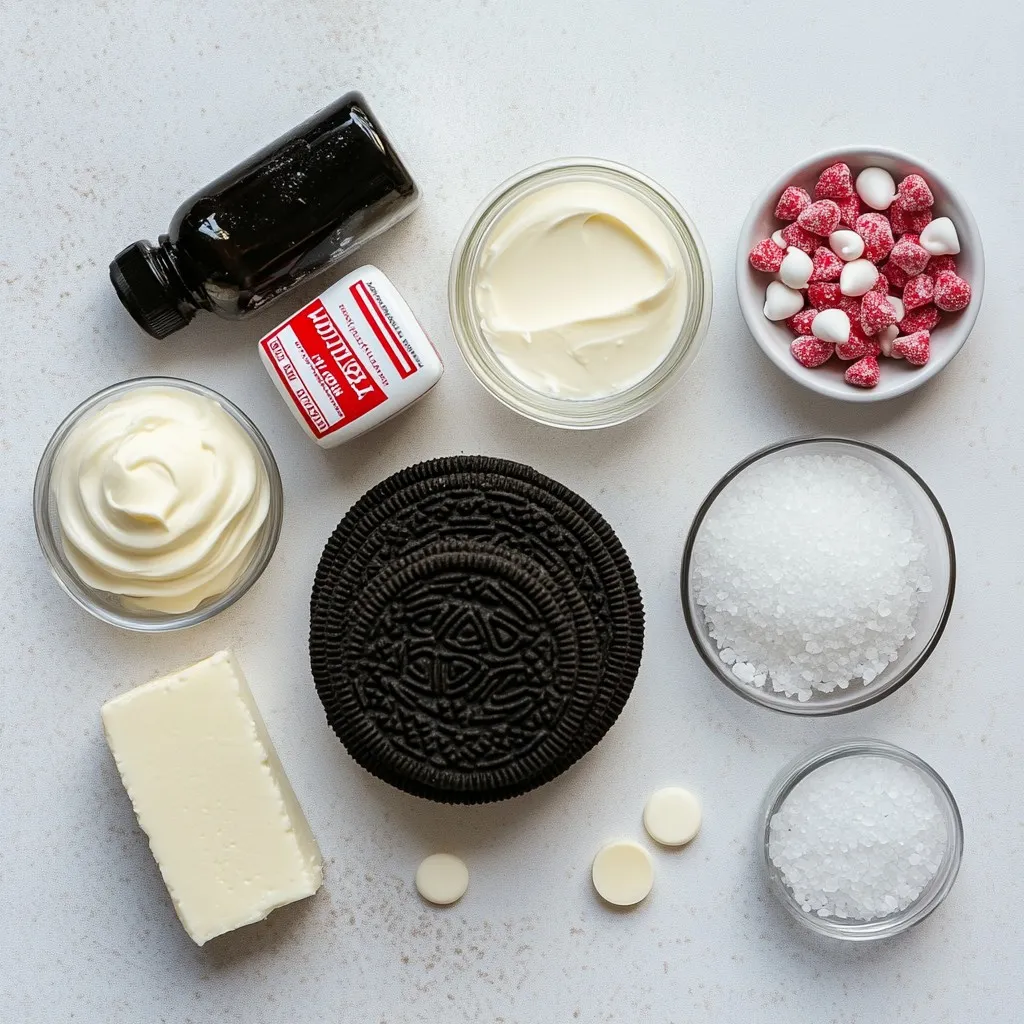
To make Peppermint Oreo Truffles, you need a few key ingredients:
– 1 package (15.5 oz) Oreo cookies
– 8 oz cream cheese, softened to room temperature
– 1 cup white chocolate chips
– 1/2 teaspoon peppermint extract
– A pinch of salt
These ingredients create the rich, creamy, and minty flavor that makes these truffles a hit.
Optional ingredients for customization
You can add fun twists to your truffles. Consider these optional ingredients:
– 1/4 cup crushed peppermint candies (for garnish)
– Sprinkles or colored sugar for festive flair
Feel free to experiment with other toppings too. Different flavors can give a unique taste.
Measuring tips for accurate results
Accurate measurements help ensure great results. Here are some tips:
– Use a kitchen scale for precise amounts.
– Level off dry ingredients with a straight edge.
– For liquids, use a clear measuring cup for easy reading.
Correct measuring leads to perfect truffles every time.
Step-by-Step Instructions
Preparing the Oreo base
Start with a package of Oreo cookies. Place them in a food processor. Pulse until they turn into fine crumbs, like sand. This step is key to a smooth truffle base. If you don’t have a food processor, you can use a resealable bag and a rolling pin. Just crush the cookies by hand until they are very fine.
Mixing in cream cheese and flavorings
Now, transfer your cookie crumbs to a mixing bowl. Add 8 ounces of softened cream cheese. Use a spatula or mixer to blend until smooth. You want no visible chunks of cream cheese. Next, add 1/2 teaspoon of peppermint extract and a pinch of salt. Stir the mixture well. This will give your truffles a great minty flavor.
Forming and chilling the truffles
With clean hands, scoop out portions of the mixture. Roll each portion into balls about 1 inch in diameter. Place these balls on a parchment-lined baking sheet. This makes it easy to remove them later. Once all the truffles are formed, put the baking sheet in the freezer. Chill for about 30 minutes or until firm to the touch.
Coating the truffles in white chocolate
While your truffles chill, it’s time to prepare the coating. In a microwave-safe bowl, add 1 cup of white chocolate chips. Melt them in the microwave in 30-second intervals. Stir in between each interval until completely smooth. Once the truffles are firm, take them out of the freezer. Use a fork to dip each truffle into the melted white chocolate. Make sure to coat them thoroughly, then let any excess chocolate drip off. Place the coated truffles back on the parchment-lined baking sheet.
Final garnishing and setting
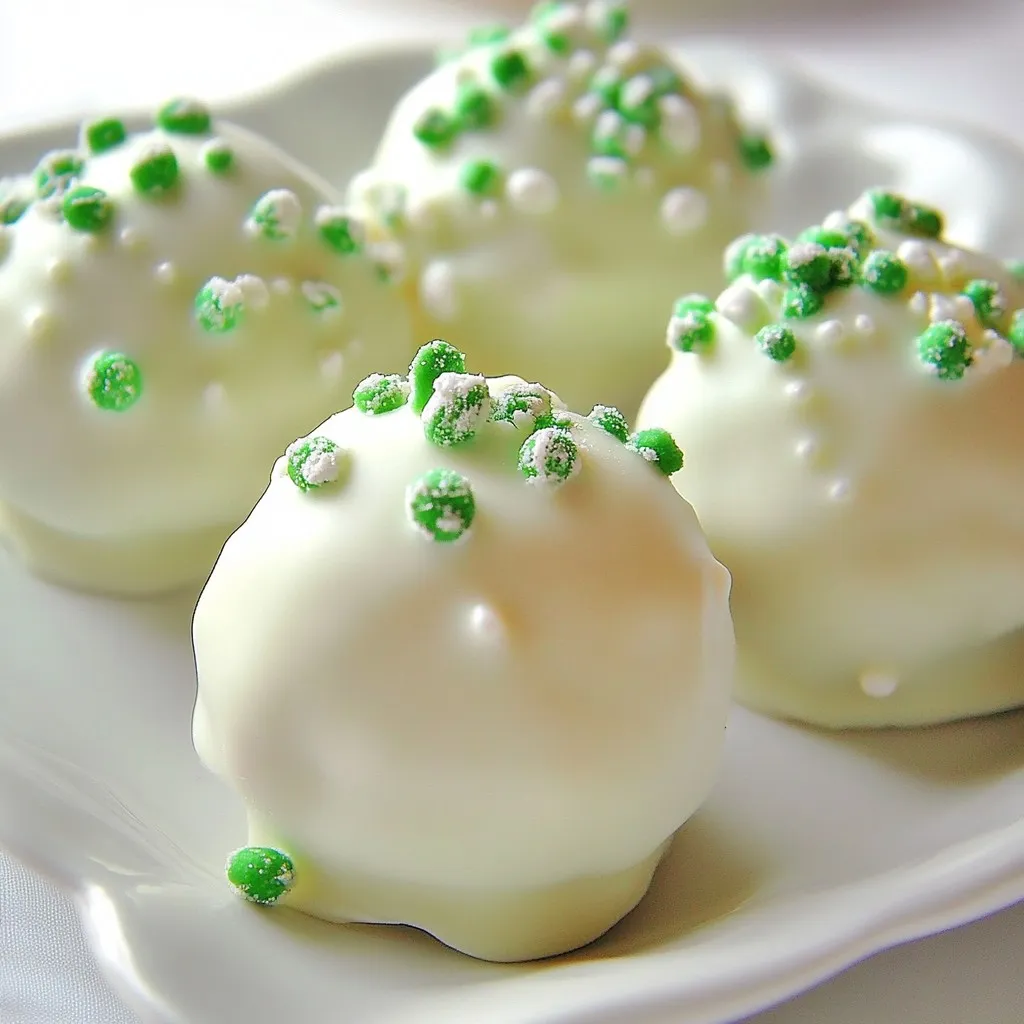
Before the white chocolate sets, sprinkle crushed peppermint candies on top of each truffle. This adds a festive look and extra crunch. Allow the truffles to sit at room temperature until the white chocolate hardens slightly. Then, refrigerate them for at least 15 minutes to firm up completely before you serve. Enjoy these delightful treats!
Tips & Tricks
How to achieve the best texture
To get the best texture for your Peppermint Oreo Truffles, blend the Oreo cookies until they are fine crumbs. This helps them mix well with the cream cheese. Make sure your cream cheese is soft. If it’s cold, the mixture can become lumpy. Mixing well until smooth gives you that creamy texture. After shaping the truffles, chill them in the freezer. This makes them firm and easier to coat in chocolate.
Common mistakes to avoid
One common mistake is not crushing the Oreos finely enough. If you have big chunks, your truffles won’t hold together well. Another mistake is melting the white chocolate too quickly. Use short bursts in the microwave. Stir often to avoid burning. Also, don’t skip the chilling step. If your truffles are too warm, the chocolate coating will melt and slide off.
Recommended tools and equipment
For this recipe, you’ll need a food processor to crush the Oreos. A mixing bowl and a spatula or mixer are essential for blending the cream cheese with the cookie crumbs. Use a baking sheet lined with parchment paper to place the truffles. A microwave-safe bowl is needed for melting the chocolate, and a fork will help you dip the truffles easily. Consider using a small scoop for even-sized truffles.
Pro Tips
- Chill Your Hands: To prevent the mixture from sticking to your hands while rolling the truffles, chill your hands in the refrigerator for a few minutes before shaping them.
- Use Quality White Chocolate: For a smooth and creamy coating, opt for high-quality white chocolate instead of candy melts, as it melts better and has a richer flavor.
- Experiment with Flavors: Feel free to mix in different extracts like vanilla or almond for a unique twist on the classic minty flavor.
- Storage Tips: Store the truffles in an airtight container in the fridge for up to two weeks to maintain freshness and flavor.
Variations
Different chocolate coatings for truffles
You can change the chocolate coating for Peppermint Oreo Truffles to suit your taste. Instead of white chocolate, try using dark chocolate. Dark chocolate adds a rich flavor that pairs well with mint. If you want a sweeter option, milk chocolate is also great. Each chocolate type gives a unique taste and look to your truffles.
Flavor variations with extracts or toppings
To add more flavor, try different extracts. Almond extract can give a nice twist. You can also use vanilla extract for a classic touch. For toppings, crushed nuts or sprinkles can add texture. Consider adding a pinch of cinnamon or nutmeg to the mix for warm spice notes. These small changes make your truffles unique and fun.
Making them dairy-free or gluten-free
You can easily make these truffles dairy-free. Use a dairy-free cream cheese and dark chocolate. Many brands offer great alternatives that taste good. For gluten-free truffles, ensure your Oreo cookies are certified gluten-free. There are gluten-free cookie options that work well too. This way, everyone can enjoy these delicious treats!
Storage Info
Best practices for storing truffles
To keep your peppermint Oreo truffles fresh, store them in an airtight container. Layer wax paper between the truffles to avoid sticking. Place the container in the fridge if you want them to last longer. Keeping them cool helps maintain their texture and taste.
Freezing tips for long-term storage
If you want to save truffles for later, freezing works great. Place them in a single layer on a baking sheet first. After they are frozen, transfer them to a freezer-safe bag or container. Squeeze out as much air as possible before sealing. This prevents freezer burn and keeps them tasty.
Shelf life for freshness
When stored correctly, peppermint Oreo truffles last up to two weeks in the fridge. If frozen, they can last about three months. Always check for signs of spoilage, like off smells or changes in texture. Enjoy them at their best for a delightful treat!
FAQs
Can I use regular chocolate instead of white chocolate?
Yes, you can use regular chocolate. Dark or milk chocolate works well. Just melt it like the white chocolate. The flavor will change, but it will still taste great!
How do I make these truffles more minty?
Add more peppermint extract for a stronger mint flavor. Start with an extra 1/4 teaspoon. You can also use crushed peppermint candies in the mix for a nice crunch and more minty taste.
What can I substitute for cream cheese?
You can use mascarpone cheese or Greek yogurt. Both will give a creamy texture. They will change the flavor slightly, but they work well in truffles.
Are Peppermint Oreo Truffles suitable for gift giving?
Absolutely! These truffles look festive and taste amazing. Place them in a nice box or on a tray. They make a perfect gift for friends and family during the holidays.
Can I make these truffles ahead of time?
Yes, you can make these truffles a few days in advance. Store them in an airtight container in the fridge. They will stay fresh and delicious for up to a week!
We’ve covered a lot about Peppermint Oreo Truffles. You learned the key ingredients, tips for texture, and how to store them. Following my step-by-step guide makes creating these treats easy. You can customize them to fit any taste, too.
In my experience, these truffles make great gifts and are fun to share. Now, get ready to impress your friends and family with your tasty creations! Enjoy making these delightful treat