Craving a dessert that’s both sweet and salty? Look no further! This Salted Honey Pie combines rich honey and a hint of sea salt, creating a treat that’s sure to impress. In this guide, I’ll walk you through every step—from choosing the best ingredients to baking and serving your pie. Let’s dive into this delightful recipe that’s perfect for any occasion!
Why I Love This Recipe
- Deliciously Unique Flavor: The combination of honey and sea salt creates a delightful contrast that is both sweet and savory, making each bite a taste sensation.
- Simple Preparation: This recipe utilizes a pre-made graham cracker crust, making it incredibly easy to whip up for any occasion without the need for extensive baking skills.
- Impressive Presentation: Garnishing with fresh lavender or edible flowers not only adds a pop of color but also elevates the pie’s visual appeal, impressing your guests.
- Perfect for Any Season: This pie is versatile enough to be enjoyed year-round, whether it’s a summer picnic or a cozy winter gathering.
Ingredients
List of Essential Ingredients
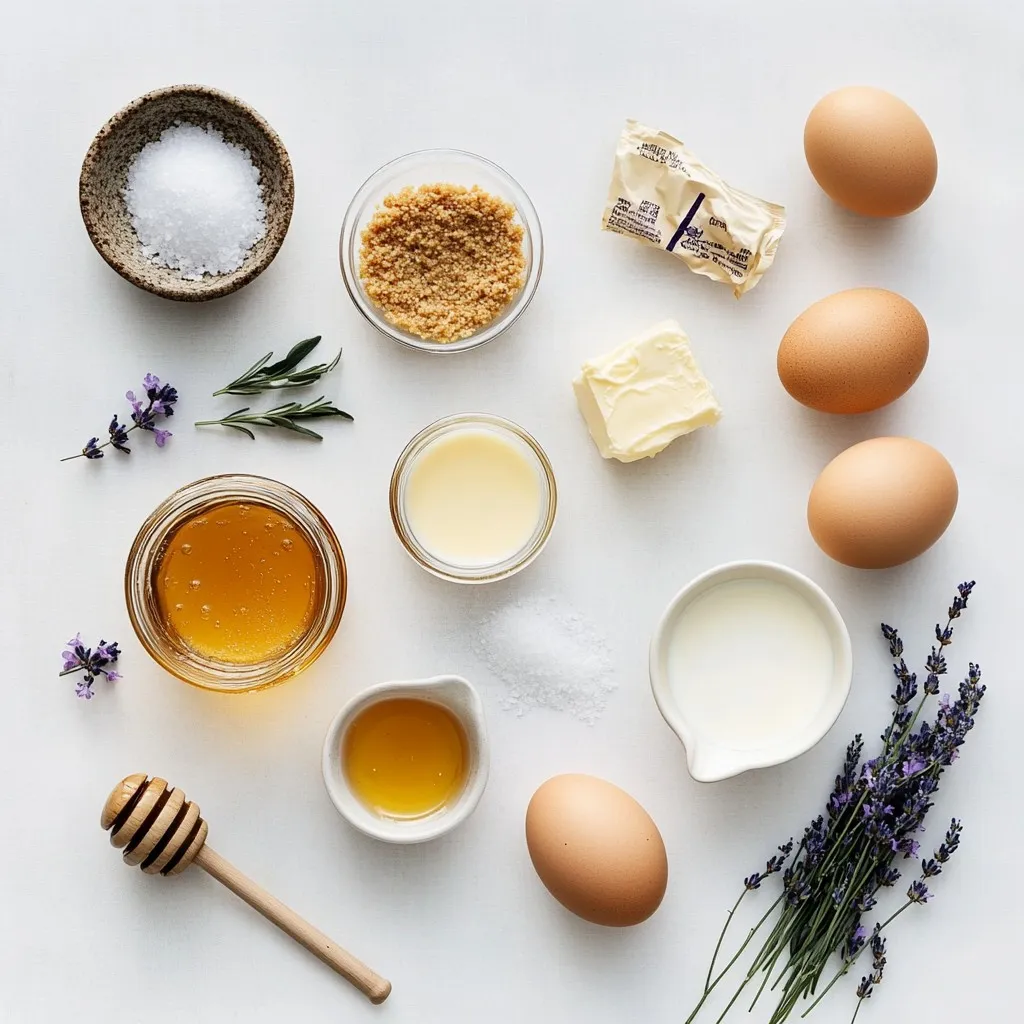
– 1 pre-made 9-inch graham cracker crust
– 1 cup honey
– 3 large eggs
– 1/4 cup unsalted butter, melted
– 1/2 teaspoon sea salt
– 2 tablespoons cornstarch
– 1 teaspoon vanilla extract
– 1/4 cup heavy cream
– Fresh lavender or edible flowers (optional)
These ingredients create the magic of salted honey pie. The graham cracker crust gives it a sweet and crunchy base. The honey adds a rich flavor, while eggs help set the filling. Butter makes it smooth and creamy. Sea salt enhances all the flavors beautifully. Cornstarch thickens the filling, and vanilla adds warmth. Heavy cream is for whipped topping, making each slice extra special. Adding lavender or edible flowers is a fun way to dress it up!
Suggested Substitutions
– Alternatives for graham cracker crust: You can use a shortbread crust or a cookie crust. They bring a similar crunch and flavor.
– Different sweeteners for honey: Maple syrup or agave nectar can work well if you want a different taste.
– Dairy-free options for cream: Coconut cream or almond milk whipped cream are great choices.
Tools and Equipment Needed
– Mixing bowl
– Whisk
– Electric mixer
– 9-inch pie pan
You will need a mixing bowl to combine your ingredients. A whisk helps mix everything smoothly. An electric mixer makes whipping cream easy and quick. Finally, a 9-inch pie pan is perfect for holding your pie. Having these tools ready will make baking a breeze!
Step-by-Step Instructions
Preparation Steps
– Preheat the oven: Set your oven to 350°F (175°C). This helps the pie bake evenly.
– Prepare the filling: In a medium bowl, mix together the honey, eggs, melted butter, sea salt, cornstarch, and vanilla extract. Use a whisk to combine until smooth.
– Pour filling into the crust: Carefully pour your smooth honey filling into the pre-made graham cracker crust. Make sure it spreads evenly.
Baking Process
– Bake the pie: Place the pie in your preheated oven. Bake for 25-30 minutes. Watch for the filling to be set, with a gentle jiggle in the center. The edges should puff up a bit.
– Cool the pie: When the pie is done, carefully take it out of the oven. Let it cool at room temperature for about 15 minutes.
Chilling and Whipping
– Chill the pie: After cooling, move the pie to the fridge. Chill it for at least 2 hours. This step helps the flavors blend and the filling set properly.
– Whip the cream: In a separate bowl, pour in the heavy cream. Use an electric mixer on medium speed to whip until soft peaks form. For added sweetness, drizzle in a bit of honey as you whip.
Tips & Tricks
Baking Best Practices
To ensure a smooth filling, start by whisking all the ingredients well. Mix honey, eggs, melted butter, sea salt, cornstarch, and vanilla until they are fully blended. This step helps prevent lumps in your pie. Always use room temperature eggs for better mixing.
To avoid cracks in the pie, do not overbake it. Keep an eye on the edges. They should puff slightly while the center remains a bit jiggly. Once baked, let the pie cool slowly at room temperature before chilling it in the fridge. This helps keep the filling set and smooth.
Serving Suggestions
Pair your salted honey pie with fresh fruit or vanilla ice cream. A hot cup of tea or coffee complements the sweet pie well. For an elegant touch, garnish with a sprinkle of sea salt on top of the whipped cream.
For added beauty, consider fresh lavender or edible flowers. These not only look great but also add a nice flavor twist. A simple mint leaf can also freshen up the presentation.
Storing Leftover Pie
To keep your pie fresh, cover it with plastic wrap or aluminum foil. Store it in the fridge. It will stay tasty for up to three days.
When you’re ready to enjoy it again, you can serve it cold or reheat it. To reheat, place slices in the oven at a low temperature. This warms the pie without cooking it further. Enjoy your delicious salted honey pie anytime!
Pro Tips
- Choose Quality Honey: The flavor of your pie heavily relies on the honey you choose. Opt for a high-quality, pure honey for the best results.
- Don’t Overbake: Keep an eye on the pie while it bakes. The filling should be set with a slight jiggle in the center, as overbaking can lead to a dry texture.
- Chill for Flavor: Allowing the pie to chill fully in the refrigerator enhances the flavor and texture, making each slice a delightful experience.
- Elevate Presentation: Garnish with fresh lavender or edible flowers for a beautiful presentation and added aromatic notes to impress your guests.
Variations
Salted Honey Apple Pie
For a fun twist, try adding apples to your salted honey pie. Here’s what you need:
– 1 pre-made 9-inch graham cracker crust
– 1 cup honey
– 3 large eggs
– 1/4 cup unsalted butter, melted
– 1/2 teaspoon sea salt
– 2 tablespoons cornstarch
– 1 teaspoon vanilla extract
– 2 cups thinly sliced apples
– 1 teaspoon cinnamon (optional)
Instructions:
1. Prepare the Apples: Toss the sliced apples with cinnamon. Set them aside.
2. Make the Filling: In a bowl, mix honey, eggs, butter, sea salt, cornstarch, and vanilla.
3. Layer the Apples: Pour a little filling into the crust. Add the apples, then cover with more filling.
4. Bake and Cool: Follow the same baking and cooling steps as the original pie.
Seasonal Variations
You can change the pie to fit the seasons. Here are some ideas:
– Fall: Add spices like nutmeg or cloves. Use pears instead of honey for a warm flavor.
– Summer: Use fresh fruits like peaches or berries. They add a bright taste and color to the pie.
Dietary-Friendly Modifications
You can enjoy this pie in many ways. Here’s how to make it fit your needs:
– Gluten-Free Crust Options: Use a gluten-free graham cracker crust. You can also make a crust with almond flour or oats.
– Vegan Version: Replace eggs with flax eggs made from ground flaxseed and water. Use a plant-based butter and coconut cream for the topping.
These variations let you enjoy salted honey pie all year round!
Nutritional Information
Caloric Breakdown
– Each slice has about 210 calories.
– Total fat is around 8 grams.
– Carbohydrates come in at about 32 grams.
– You will find around 3 grams of protein per slice.
Health Benefits of Ingredients
– Honey is a natural sweetener. It has antioxidants and can help soothe a sore throat.
– Eggs provide protein and healthy fats. They are also rich in vitamins and minerals.
– Butter adds flavor and helps create a rich texture in the pie. It contains healthy fats that support energy.
Moderation Tips
– Keep slice sizes small. One slice is enough to satisfy your sweet tooth.
– Pair the pie with fresh fruit or a salad. This balances the dessert with nutrients.
FAQs
How to store Salted Honey Pie?
To keep your Salted Honey Pie fresh, store it in the fridge. Cover it well, using plastic wrap or a pie cover. It will stay good for up to four days. Make sure to check for any signs of spoilage, like an off smell or a change in texture.
Can I use a different crust for this pie?
Yes, you can use a different crust if you like. For a nutty flavor, try an almond or pecan crust. A cookie crust made from Oreos works well too. Just be sure your crust is firm enough to hold the filling.
How long does the pie last in the fridge?
The pie lasts about four days in the fridge. After this, it may start to spoil. Look for signs like a change in smell or texture. If it smells bad or looks off, it’s best to throw it away.
Can I make this pie in advance?
You can make this pie a day ahead. After baking, let it cool and chill in the fridge. If you want to freeze it, wrap it tightly. It can stay frozen for up to three months. Just thaw it in the fridge overnight before serving.
This blog post covered everything about making a delicious Salted Honey Pie. We discussed essential ingredients, tools needed, and step-by-step instructions. I shared tips for a smooth filling and serving ideas. You can try different variations and dietary options.
You now have the knowledge to create this unique pie at home. Enjoy baking it and impressing your friends and family with your skill